Creating a drum loop
I am about as far from a Cubase expert as you can get, however I do qualify as a Cubase dummy and as such can understand the problems faced by a beginner and the extraordinary lack of help available for people with no knowledge of computer recording software. I have written this guide so that others can avoid the pain and suffering I went through to fulfill what should be a very simple task. I should add that I was professional session musician with 30 years experienced, a qualified Microsoft systems engineer and the author of some successful language learning software (WordBanker) so I really shouldn’t have found it that difficult.
If you find any mistakes or some of the words I have used are not sufficiently cool please contact me and let me know.
CREATING A DRUM LOOP.
There are many ways to salvation and this is but one of them.
- Create new project
- Right click anywhere and “Add instrument track”
- Select “Groove Agent SE”
- Right click on Beat Agent and select “load kit”
- Pads should now be loaded with drums
- Decide what drums you want to use.
Nb. You can’t record by clicking on one of the pads. You have to use a midi keyboard or the virtual keyboard (Alt+K). If the virtual keyboard is not working click change octave by clicking on one of the lines at the bottem until you hear something.
Close groove agent window
Right click on the groove agent track and select “duplicate track”, Name the new track “Drum Fills”. You will go back to that later.
- Open Transport panel (F2)
- Set the locator to start at bar 1 and end at bar 3 (or whatever length you want the loop to be.
- Click loop button (should turn purple)

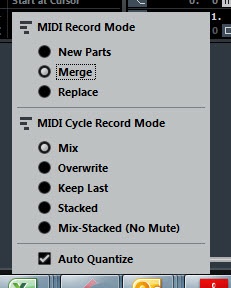
Set the recording to mix and merge and enable the auto quantize.
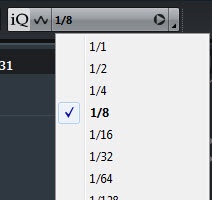
If you find the recording doesn’t sound the same as what you have played you probable have the quantization set to the wrong value. If some of your playing is missing increase the value. If it is all there but it sounds all over the place decrease the value. If you are feeling brave (and sober) you can of course turn off the quantization. You may find there is a slight delay between playing a drum and it being recorded in which case quantization is essential. Quantization can be changed on the menu bar at the top.
You are ready to start recording.
- Make sure recording is enabled on the groove agent track. This usually happens by default when it is added so you shouldn’t need to bother.
- Start recording and start with the bass drum. If you mess up, stop the recording and click Ctrl+Z to undo. When you are happy with the bass drum, stop the recording.
- Continue with the hi hat and add each drum stopping the recording after each drum, that way if you mess up and want to undo, then the previous recordings (which were ok) will not be lost.
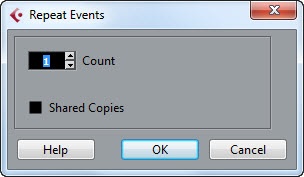
- When you are happy with your loop, estimate how many bars will be in your song. Select your loop and click Ctrl+K. Assuming there are 100 bars in your song enter 50 in the box (remember your loop is 2 bars long). To keep it simple I recommend not checking the “shared copies” box. Click OK.
Your groove agent track is now filled with your basic drum loop which can easily be changed at any time. If there is a break in your song simply select that bar and delete it.
If you want to do any drum fills use the “Drum fills” track so as not to mess up your basic drum track.
Personally I find it much easier to work with a duplicate track for all instruments when overdubbing or correcting mistakes rather than using auto punch in. When I have made the correction I just move it to the main track.
[hupso]